
Blog
Bi-weekly blogs are posted on project progress and once a month there is a video update.
Week 1
Setting Up
 To kick off, we arranged a meeting with all group members out of hours. We discussed our experiences,
our strengths and our weaknesses. We talked about this in the context of what roles and
what work we might want to take of the project.We set up
a Microsoft Teams group, a Github repository. We set up a Google Doc to track interactions
with the client.
To kick off, we arranged a meeting with all group members out of hours. We discussed our experiences,
our strengths and our weaknesses. We talked about this in the context of what roles and
what work we might want to take of the project.We set up
a Microsoft Teams group, a Github repository. We set up a Google Doc to track interactions
with the client.

Having not received the project brief from UCL, we reached out directly to our client, Apian, via email to try and get a project briefing and set up a call. Apian was quick to respond and set up a meeting. As we did not have the project briefing, we instead used the time to try and offload work down the line by asking what the TAs what deliverables there would be within the project and working on them. For example, we set up the portfolio blog in the first week. Additionally, we attempted to preemptively write some questions for our client without the project briefing as a formative thinking task. We used the client's website as inspiration for the kind of questions we would ask. These questions were noted on the Google Doc.
Questions we came up with:
- Who exactly is going to use the application?
- What is already done/implemented from Apian side? Mostly thinking about the integration of our app into the existing system.
- What flexibility is there regarding deadlines?
Next Steps:
- Wait for project brief
- Using project brief, refine questions further
- Ask questions to client and agree on requirements with client.
Week 2
Discussing the Project Brief
This week we received the project briefing notes, a little in advance of our initial meeting with Apian, using the briefing, we further refined our questions for areas where there were gaps in understanding of the briefing or our knowledge, while raising new questions
The initial project briefing we received was as follows: Healthcare drone porter interface, simulating porters around a hospital with multiple building sites, and can make use of AirTags, BLE devices and other ways of beacon route finding. Design a front end UI that is cross platform, as well as a SharePoint solution with equivalent UI to do an A-B test for comparison of results. Mimicking the UCL buildings to begin with will be a good starting point. Both packages should enable a hospital to plot locations of porters, and issue requests to them via Twilio, demonstrate queue and prioritisation of work, and integrate with other communication services.
Our final questions were:
- Who exactly is going to use the application?
- For the web application, is it going to be used on mobiles? Should we support mobiles, have usable designs for them?
- What BLE devices are we going to use for location tracking?
- What is already done/implemented from Apian side? Mostly thinking about the integration of our app into the existing system.
- What criteria are going to be used to prioritise work? Who provides the information on it?
- How should emergencies be handled? Eg. What should the porter do if they’re in the middle of a delivery? How to interrupt (or not) ongoing deliveries from technical and from business side?
- With regards to tracking porters in a multi story building, do you already have a solution to this? We were thinking of using the porter’s smartphone to find out interior tracking and to know which floor the porters are in.
- How can we track individual high priority assets and equipment? Is this within the scope of the Apian? The alternative would be returning equipment to storage asap after use and a porter to check if equipment is available in storage (slower)
Next Steps:
- Ask the client our refined questions
- Agree on requirements for the project
- Set up methods of communication with the client and expectations
Week 3
The Client Meeting
During our meeting with Apian, we asked the finalised questions that we wrote prior to the meeting. We received either answers or notes for follow up. These were noted in the google Doc to log meetings that we created.
Answers to our previous questions
Who exactly is going to use the application?
Estates & Facilities management staffwho organise, e.g. porters and , helideck personnel and in some cases, transport facilities, Laboratory staff, Pharmacy department staff.What are porters?
Porters are staff who move patients and equipment around the hospital.For the web application, is it going to be used on mobiles? Should we support mobiles, have usable designs for them?
Both mobile and desktop. Should be web based and PWA for mobile.What BLE devices are we going to use for location tracking?
UCL recommends Airtags; we could also use other BLE tags Airtags can only emit a pinging sound. To be confirmed and agreed upon after more research.What is already done/implemented from Apian side? Mostly thinking about the integration of our app into the existing system.
Nothing.What criteria are going to be used to prioritise work? Who provides the information on it?
Further research is needed to determine how porter workload is currently prioritised. A crash call that requires a porter to get blood packs for transfusion will always take priority above anything else.Prioritisation criteria will be determined by medical need, incorporating: If sample is labelled as urgent or not by the clinician, required turnaround time e.g. renal samples need to be delivered to a lab by 2pm to ensure same day results vs another sample that can wait for next day delivery, time-related payload constraints e.g. an item needs to be temperature controlled and the packaging only can keep it at a certain temperature for X hrs so must be delivered before the cold chain is breached.
Then we can add other layers such as: Prioritisation between samples and other porter work, Travelling salesperson problem - should a lower priority item be collected on the way to a higher priority item if timing is not significantly affected?
Capacity of the drone (a lower priority item may fit in the next incoming drone while a more urgent item can only fit in an empty drone that’s coming in next) - this implies higher volumeHow should emergencies be handled? Eg. What should the porter do if they’re in the middle of a delivery? How to interrupt (or not) ongoing deliveries from technical and from business side?
Further research is neededWith regards to tracking porters in a multi story building, do you already have a solution to this? We were thinking of using the porter’s smartphone to find out interior tracking and to know which floor the porters are in.
Further research is needed. Porters don’t necessarily carry work liable smartphones.How can we track individual high priority assets and equipment? Is this within the scope of the Apian? The alternative would be returning equipment to storage asap after use and a porter to check if equipment is available in storage (slower)
Out of scopeSUMMARY
To summarise our new understanding of the project, we wrote a problem statement and
solution for our partner to review and check we were on the same page:
The issue we are addressing concerns the prompt delivery of pharmaceuticals and other
medical packages within hospitals across the UK. Currently, this task is carried out
by human porters who transport packages within the hospital and make deliveries in
response to requests sent via SMS pagers. In larger hospitals, drones are also used
to transport packages between buildings, with porters handling the loading and
unloading of the drones on either end to save time.
However, the current system suffers from significant inefficiencies. Whenever a
delivery needs to be made, a request is sent to all porters, and the first responder
is tasked with completing the delivery. This approach disregards factors such as a
porter's proximity to the parcel or their availability, leading to delays and
unnecessary strain on hospital staff.
Our proposed solution involves tracking the location and availability of porters
to ensure optimal task assignment based on proximity, which will eliminate the
need for drones to wait for deliveries. Additionally, we plan to make the process
of placing a delivery request as user-friendly as possible for hospital staff,
which will help to reduce patient waiting times.
Next Steps:
- Agree upon project requirements with Apian
- Plan the project and find an initial direction of work
Week 4
Having now answered the questions posed last week and meeting Apian once more this week, we aim to settle on some initial requirements for the project. These requirements will help us plan the project and measure success. Prior to our meeting, we create personas of the potential users of our hospital porter tracking system. These personas help to shape our thinking and requirement setting.
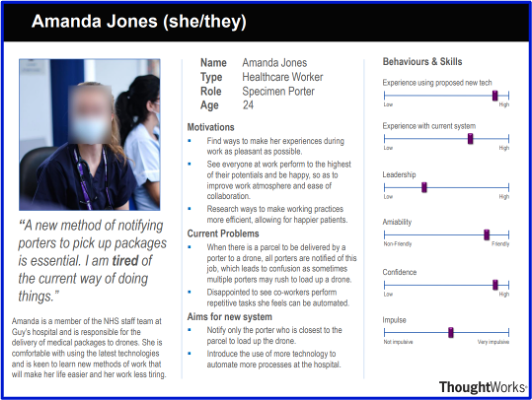
Amanda, a porter at Guy's Hospital and a member of the NHS staff, is responsible for loading medical packages onto drones in response to requests from laboratory staff. She finds the current system inefficient and exhausting because all porters are notified whenever there is a package to be delivered, regardless of their location in the hospital. Amanda is a person who strives to improve her work methods to make them more efficient and save time and effort. She believes her colleagues should do the same to create a happier atmosphere and improve working conditions. Despite not being a natural leader, Amanda appreciates that we considered her ideas when developing our new application prototypes.
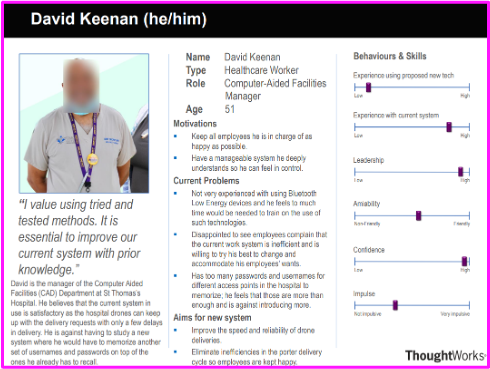
David is the head of the CAD department at St. Thomas's hospital and is also a potential user of our system. However, unlike Amanda, he has a different perspective on the current drone delivery system for pharmaceuticals. He finds the current system to be satisfactory as the hospital drones can keep up with delivery requests with few delays. He prefers not to adopt a new system that would require him to remember more usernames and passwords in addition to the ones he already has. Although David prioritizes employee satisfaction, he would only consider changing his mind if there were no other options available to his staff. He understands the potential benefits and improvements that our proposed solution would provide. David also considers himself a confident and capable leader, preferring a system that allows him complete control to guide his staff when necessary.
Following the meeting with our client, working closely with them we settle on the following requirements:
- There must be a webapp for an administrator to set tasks and an android app for porters to handle their tasks.
- On the android app, the porter must be able to accept/decline delivery requests, set their own availability, and log in.
- On the webapp, the administrator must be able to view live locations of porters, send delivery requests to porters, view different floors of the hospital, register porters by adding name and phone numbers, add the position of tracking beacons in the hospital and make porters available/unavailable.
With requirements set, we now are able to plan the project using a Gantt chart which we make below. Additionally, we decide that the logical next step is to prototype UI to gain a better understanding of what users need.
Next Steps:
- Prototype UI on figma and have concrete design to implement
- Meet with Client to check for approval on the design
Week 5
UI Prototyping
Now with the requirements set and the project clarified, we are in a position to start prototyping. We decided that the best way forward would be to start with UI. As increasing hospital porter efficiency is core to the project, an easy to navigate and intuitive UI is imperative to a successful project and should be determined early on. Additionally, we felt that by prototyping UI, we would be able to more easily spot missing requirements and functionalities with a visual stimulus and being able to act as a user.
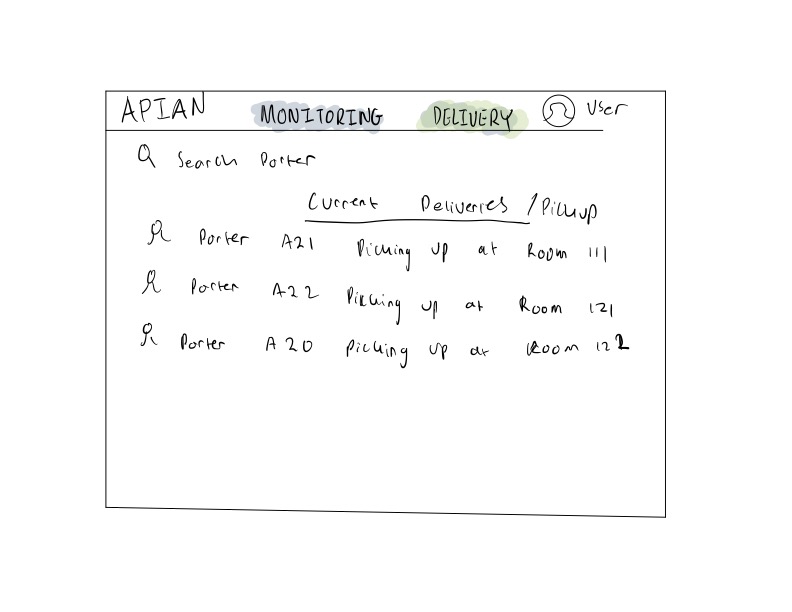
After discussing the requirements among the team and weighing the pros and cons of potential UI implementations, we developed two initial sketches to meet the client's needs and prioritize usability:
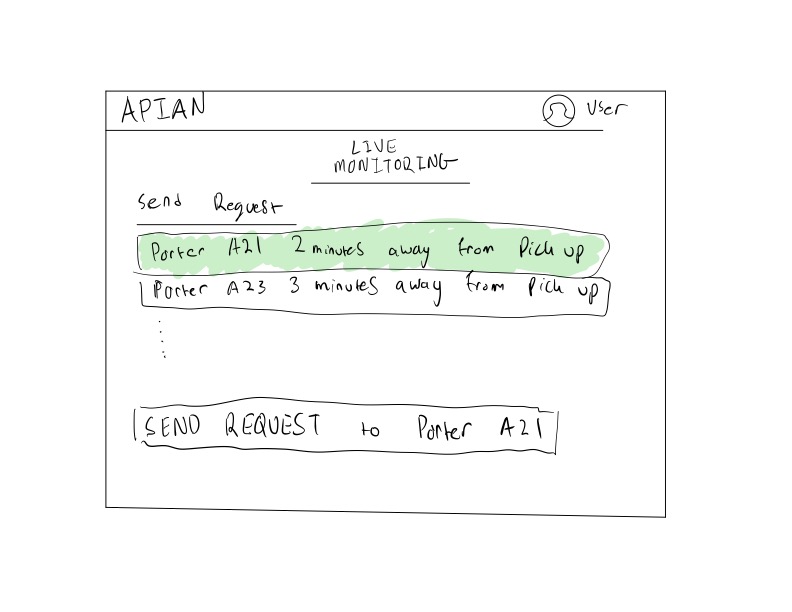
The first sketch aimed for simplicity and ease of use, featuring a navigation bar for switching between live monitoring and delivery details. The live monitoring page displays porter availability with markers and allows sorting by distance, meeting the project requirements. The delivery details page provides a delivery history for logging and sanity checking.
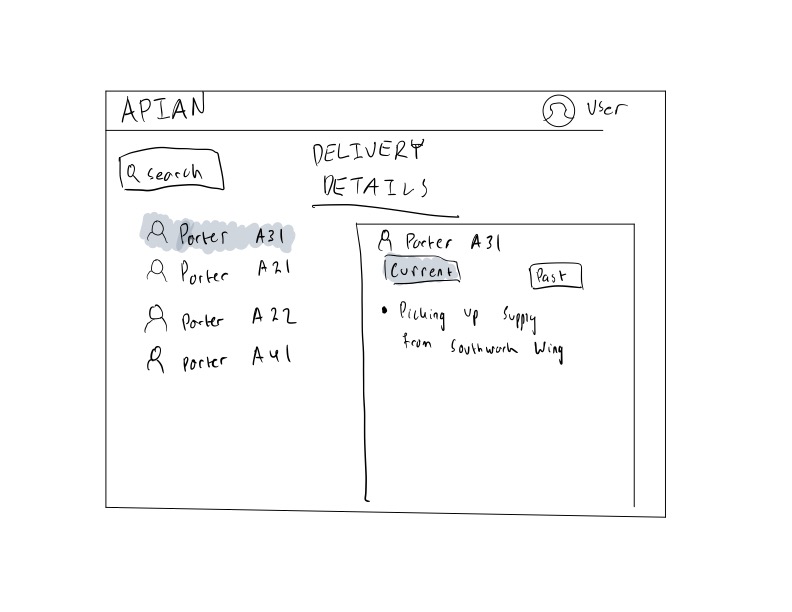
The second sketch incorporated improvements such as a table on the delivery request page for better readability and access to features. Additionally, a view option was added to enable the user to see different hospital areas, reducing information overload.

We utilized the best components from both sketches to design an interface on Figma. Our iterative design process involved internal discussions and client feedback to incorporate desired features and ensure user-friendliness. The client's feedback during the Figma design review was particularly valuable, suggesting font changes and using Bootstrap UI icons for dropdown and 'sort by' components. They also advised on improving the display of the active page.
Having finalized this iteration of the design, we approach our client in the weekly meeting for review. Prior to the weekly meeting we emailed the client and they agreed to bring their in house UI/UX designer to provide pointers.
During the meeting, our client was quite happy with the design and agreed that features were intuitive and all essential. The UI/UX designer gave us some pointers about the colours we could use in order to closer follow Apian’s colour scheme and further pointed out areas where the UI could be cleaned up.
Next Steps:
- Following the meeting, next steps would be to clean up the UI
- Begin researching what our tech stack for the project would be, trying to nail it down
Week 6
Before we start developing the product, committing ourselves to a tech stack, we perform some market research of existing solutions. We do this to discover and maintain the merit of previous solutions while improving on their shortcomings. We look at two such companies in particular.
UBI Solutions

UBI Solutions is a French software company that specializes in developing asset tracking solutions primarily using RFID tags and mobile or fixed readers. Their solutions cater to various industries such as food, laundry, retail, and more. The company's main focus is on providing tailored solutions that meet their clients' needs effectively. We looked at their Hospital Assets Tracking solution, a problem similar to the problem our project faces. UBI utilizes BLE tags and beacons to track hospital assets such as bed sheets. The system aims to free up staff time, reduce equipment loss due to theft or negligence, log asset usage data, and implement automatic preventative care of assets.
Navenio

Navenio, on the other hand, is a UK-based company that focuses on increasing hospitals' ROI with their smartphone-based location tracking and task assignment solution for hospital staff. They use a combination of IUD, GPS, and Wi-Fi to track staff locations accurately and utilize a task assignment system to increase efficiency. The system is capable of multiple floor location and tracking and can provide recommendations based on collected logistic data.
Further Research
After conducting initial market research and considering the client's small budget, the team explored budget options for Bluetooth tracking and communication. They considered low power BLE beacons, GPS, and a combination of Bluetooth and GPS for more accurate tracking. They also knew they would have to develop a mobile app for porters and a website for administrators, which led them to choose React Native as a safe and performant choice due to its cross-platform nature. Ultimately, the client guided the team to create an Android app for porters to use, which we decided to write in Kotlin.
The Client Meeting
While initially the client wanted a solution that was as cross-platform as possible, they agreed that an android app would be more conducive than a react native app as the client, having worked at google previously was much more familiar with android.
Next Steps:
- Having agreed on the tech stack for the applications, we now needed to do further research for the hardware side of things and acquire necessary tracking devices
Week 7
Initial Considerations
At this stage, we know that should we choose beacons we must acquire them somehow. We also know that the specific BLE beacon that we choose to use for the project must be 1. Currently available in production and not deprecated and 2. Not too costly. As cost is quite an important factor due to our client’s small budget, being a start-up, we know that this is something we need to discuss with them this meeting.
The Client Meeting
Before we had the chance to go to the helpdesk and check, we had our weekly client meeting in which we discussed the issue. Our client happily agreed that they would be willing to fund any necessary purchases for the project and subscriptions to services should we need it, assuming the price was below £50, our client gave the greenlight to purchase any products necessary. This was extremely helpful, giving us a backup option if the computer science help desk did not have BLE beacons.
Visiting the Helpdesk
This week, we visit the Computer Science help desk several times until the relevant staff is available. We are able to obtain a variety of BLE beacons to experiment with (some broken, some without battery).
Next Steps:
- Develop an initial Android app which can scan for the BLE beacons
Monthly Video 1
Week 8
Initial Considerations
Now that we have obtained Bluetooth beacons, we are ready to commence our efforts to implement an application that can track their location, as specified by the project requirements. As previously noted, the development of a mobile application is a crucial aspect of our project, as per the directives of Apian. However, our team did not possess prior experience in developing mobile applications. As a result, our project partners suggested that we develop an Android application and provided us with a variety of resources to initiate our implementation, including Android Developers and LinkedIn Learning.
Developing the Android App
Our primary focus during the initial stages was on the implementation of the essential functionality of our Android application. We developed an application that could scan for BLE devices with minimal user interface. This was a challenging task for us since we were still acquainting ourselves with how fragments, activities, and services operated in the Android development ecosystem. Moreover, one of the obstacles that we had to overcome was that many of the resources and tutorials we found online for BLE scanning used deprecated classes and methods. Thus, we had to create our version of a method to manage BLE scanning callbacks.
The Result
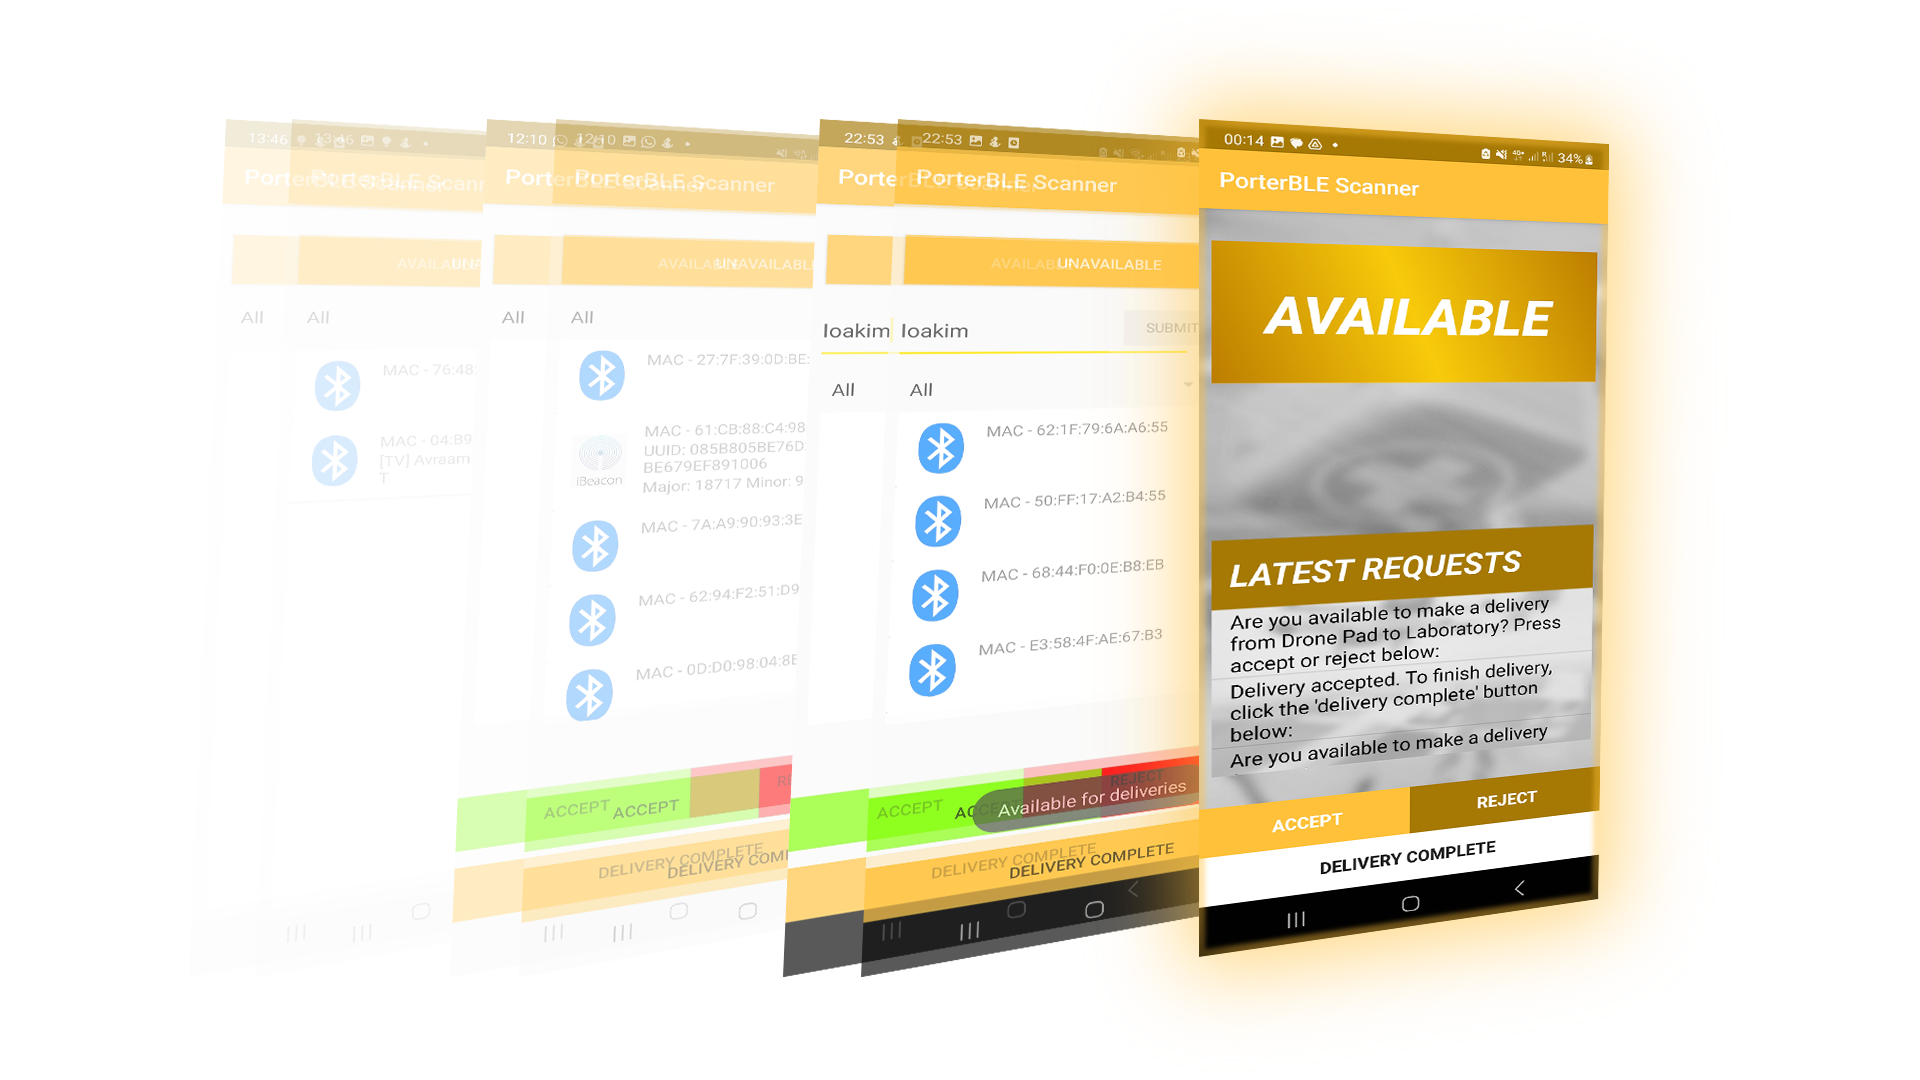
After putting in countless hours of effort, we were finally able to create our first sample application, which scanned for nearby Bluetooth devices, including BLE beacons, and displayed their MAC addresses. This implementation proved to be a valuable learning experience for our team and a crucial step towards developing the desired product.
Next Steps:
- Having developed the android app, we now must carefully test the beacons we acquired from the computer science helpdesk to determine whether they are sufficient for the project
Week 9
Testing Our Beacons
This week, possessing an app that can scan for BLE beacons and said BLE beacons, we use a temporary version of the app to experiment with the BLE beacons and signal strength. To see how feasible location tracking is using BLE beacons, we test the signal strength through:
- 1, 2, 3 Walls
- Different Phones
- Different Phone cases
- Different floors
Control Methods
We utilize walls and floors of different buildings, utilizing walls of the engineering building, walls of the Henry Morley building and walls of the student centre. These three buildings were chosen due to their clearly variable building age. We hope that in choosing buildings with different ages, we also have walls of varying thicknesses.
When testing walls, we used a tape measure to fix the distance between a beacon and a phone to provide valid comparisons. We estimated our error in distance to be within 10%.
When testing through floors, we used GPS of control phones to make sure one person was on top of the other. GPS we used was accurate to 5 metres and as such we also knew our margin of error with regard to distance here. Where possible, we tried to minimize error by standing in a known identical position on different floors i.e. ends of corridors in engineering building.
Results
The results of our experiments proved that signal strength of the BLE beacons measured by the phones was highly variable depending on obstructions. We found through testing that even phone cases and partial obstructions would interfere with the signal strength reading.
At this point in the project, we know that accurate location tracking of porters using signal strength triangulation, as we initially hypothesized was definitely not viable. We foresaw this problem early on and noted our backup plan thankfully.
Our New Solution in Response
Following this confirmation, we endeavour to move towards either a “chokepoint” solution or room by room solution depending on further discussion with our client. For the “chokepoint” solution, we would instead of placing beacons regularly spaced in the building, place beacons directly at key points in the hospitals such as the ends of certain corridors. This would be used to determine at what position within the hospital porters are. Alternatively, if the client asks for more accurate position checking, we will use the room by room solution, and place BLE beacons per room to determine what room porters are in. If a client requires more accurate position checking still, although we doubt this is necessary given the goals of a hospital and the little merit to efficiency of porters, we will place three beacons in each room and triangulate porter location.
Next Steps:
- We need to liase with our client to further determine whether or not the BLE beacons we obtained and their limitations are appropriate for the project.
- We need to set up the webApp for the administrator to use and connect it to the android app.
Week 10
Discussing Last Week's Results with Our Client
Following on from last week’s experiments and our need to discuss our findings with the client, we meet with the client in person on Tuesday to discuss the matter. In this meeting, the client more carefully explained the exact premise of the project that we are working on. Our project will be made to aid porters in (un)loading of drones between two hospitals. There is only one station per hospital. The client agreed that exact location tracking of porters with multiple beacons in each room was both unnecessarily expensive to implement and without merit to hospital efficiency. Given the other two propositions of tracking via chokepoints and per room, the client was initially very impressed with the creative thinking and leaned towards a chokepoint tracking system. However as discussion went on about both the extendability of the project and generalization of the solution to be applied to more hospitals more easily, we opted for the beacon per room solution. We also decided that the two solutions were in fact also synonymous as it was up to discretion whether or not all rooms contained beacons. At this point, our requirements have become more clear.
Setting Up the Website
This week, for the project, we setup the backend and frontend of the webapp that administrators will use. Initially, we considered various options for implementing the backend of our application. After careful evaluation, we chose to utilize the Spring Boot framework with Google Cloud SQL PostgreSQL for our database and deploy the app with Google Cloud Run. Some team members had prior experience with Spring Boot and recommended it as a dependable choice for our project. Additionally, our client recommended using the Google Cloud stack, which we found to be efficient and reliable for our needs. By selecting these technologies, we were able to create a strong and scalable backend system capable of processing real-time updates from the frontend accurately.
Backend
We followed the standard Spring Boot package structure, dividing our code into packages for controllers, services, models, and repositories. This ensured that each part of the application had a clear and distinct purpose, maintaining separation of concerns. By utilizing this common code structure, we developed a robust and reliable backend that was easy to maintain.
Frontend
For the frontend we use React due to the extensive code ecosystem providing plenty of examples to create UI and further due to React’s performance benefits. React makes extensive use of caching and immutability to create both rigorous determinant code and good performance, loading only what is necessary.

We structure our frontend with a page system, where each page is a wrapper component which will contain child components for individual features such as tables.
Next Steps:
- We need to edit the Android app to properly connect with the backend for post and requests
Week 11
Now that both frontend and backend have been setup, we test Beacon scanning and mac address posting so that we can at least have an end to end system. We manage to successfully implement this on the android app. The backend receives beacon pings from the mobile app on POST "/porterPings."
Next Steps:
- We need to update the UI and add additional features that are part of the requirements
- We need to set up backend database to accommodate for these features
Week 12
Setting Up a Database to Accommodate Features
Having an end to end solution, we are now ready to flesh out the frontend UI adding additional features that we set out in the requirements and extend the backend to facilitate said features. This week, we implement the ability to add and remove data such as porters and beacon mac addresses through the UI, without hard coding them in (as we were doing previously). To do this and sustain data between sessions, we obviously need a database and go about setting this up this week.
Backend
Our backend implementation utilizes Cloud SQL PostgreSQL as our database. Cloud SQL PostgreSQL is a fully managed relational database service that provides high performance, scalability, and availability. We selected this service because it is compatible with Spring Boot and offers automatic failover and data backup, which are critical for our application's reliability. With Cloud SQL, we quickly and easily set up our database, without worrying about infrastructure management. We have local configuration details in the application.yml file, while production configuration can be found in application-prod.yml. You can modify the datasource username, password, and instance-connection-name to configure the database.
API
Domain Objects We implemented CRUD operations with REST API for our porter, location, delivery, and beacon domain objects. This allows us to create, read, update, and delete records in our database through HTTP requests. For instance, to create a new porter, we can send a POST request with the necessary information in the request body to the "/porters" endpoint. To retrieve all porters, a GET request can be sent to the same endpoint. We implemented similar endpoints for other domain objects. By using REST API, we made it easier for other systems to integrate with our system and interact with our data.
Additional UI Updates
Additionally, with this added functionality the UI is beginning to become crowded, as such this week we also add a navbar to flip between the pages, building on the initial page structure that we developed early on.
Next Steps:
- We need to make communication between backend and the android app two-way, porters need to be able to accept/reject requests as per requirements, but the administrator must also be able to set tasks.
Monthly Video 2
Week 13
Integrating SMS Communication
Currently the system is one way only, porters can only communicate with the webserver and post information. For our solution however, we need to be able to communicate in both directions. Having discussed requirements previously with our client, we knew that they wanted an SMS solution to make the project as extendable as possible. This was because they were concerned that porters may not have access to a smartphone in some hospitals, or that in the future for privacy reasons, porters may not use their personal phones for the app. They suggest to us using Twilio to implement this.
Using Twilio

As part of our backend implementation, we integrated the Twilio messaging API to enable sending and receiving messages to and from the porters. We opted for Twilio because it offers a reliable and user-friendly API for SMS messaging that suits our requirements. To incorporate Twilio into our backend, we utilized the Twilio Java library and set up an API key and authentication token for our Twilio account. Additionally, we included configuration options in our application.yml file for easy modification of the account SID and authentication token as needed. By integrating Twilio, we provided real-time messaging capabilities to the porters, allowing them to receive important updates and information about their tasks directly through the application.
Using the Twilio SMS features, we are able to assign, accept and reject tasks from the porter phone by replying to the SMS message. When porters finish tasks, they must also send a message to declare that the task is finished and whether or not they are available for further tasks.
Next Steps:
- We need to begin tracking porter location data
- We need to display porter locations on the frontend
Week 14
Implementing an Initial Map
With a successful implementation of SMS messaging fully two way end to end communication between the administrator and porter, we begin approaching actually tracking the porter locations. Firstly, we update the administrator UI with a dummy map for testing, and work on generating markers on the map based on porter information. We map the beacon MAC addresses to their corresponding locations on the floor plan. Once we have the location information, we update the porter's location in the database based on the nearest beacon.
Live Updates
Live Updates We utilized JPA's EntityListeners to push live updates whenever there are porter updates. PorterEntityListener is a class that listens for any changes in the Porter entity. If there is a change, it automatically sends a real-time update to the frontend via websockets, which updates the porter's location on the floor plan in real-time.
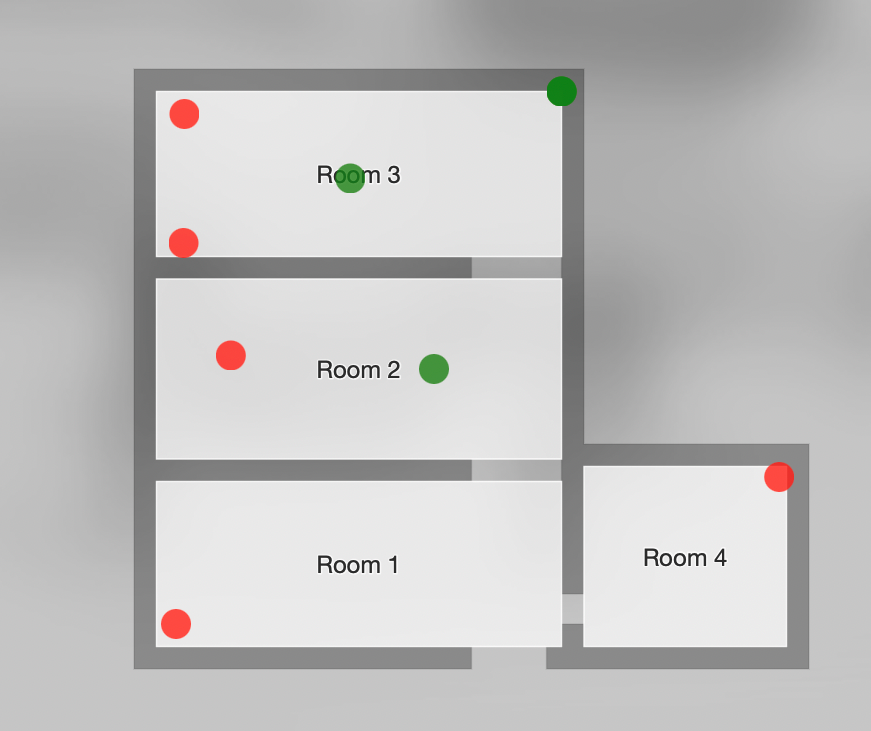
Currently, location data is dummy information and not real tracking information, but we will implement this properly as the project goes on.
Client Meeting
This week our client also raised a concern of security. They were concerned that either: 1. The wrong phone number may be registered to the system or 2. A malicious attacker may post requests and the backend will accept the requests regardless of veracity. We explained to them that the second problem was currently not a concern as only verified phone numbers that the administrator adds had their request and post messages accepted by the backend. However, there was the concern of registering the incorrect phone number.
Our Solution
We proposed a solution of an online confirmation mechanism, much like when a website asks you to type your password twice to ensure there are no typos, however the client was still concerned that a phone number could be typed incorrectly twice which could prove disastrous to assigning porter tasks. As such, we agreed to implement an SMS one time pin verification method.
Now that the project is nearly complete, we need to begin integrating a map of the real hospital to the website.
Next Steps:
- Implement one time pin and verification of phone numbers
- Request hospital map
Week 15
The Importance of Verification
For the security requirement of our project, we need to make sure that only authorized phones have access to the system. We also need to make sure that wrong phone numbers are not verified by mistake.
This week we implement more Twilio SMS messaging for authentication purposes, sending one-time PINs to users to ensure only authorized personnel had access to the system.
Authentication
Authentication For authentication, the user sends a login request to the backend, which triggers the server to send a one-time PIN (OTP) via SMS to the user's registered phone number. The user then inputs the OTP. If this is successful, the phone number is verified.
Other Features
In addition to this, this week, we fully implement the porter tracking system. Porter locations on the map are no longer dummy data, and we map porter location data, based on the strongest beacon signal strength transmitted by the porter phone.
The Client Meeting
Our client is happy with the results and the response to their request from the last session.
We also see room for improvement in the workflow of administrators, as administrators should always assign tasks to the nearest porter, we can actually look at automating this. Having discussed this with our client previously near the start of the project, while the feature is not entirely essential, it would be incredibly beneficial to implement. We raise this in our weekly discussion with our client and they once more confirm that this would be a beneficial feature.
In the meeting with our client this week, knowing that we need to move towards implementing the project for a real hospital, we raise the concern that we need detailed floor plans of our hospital. The client agrees to this but mentions that it may take several weeks to receive approval and release this to us due to their own internal tasks and due to privacy and security concerns of the hospital.
Next Steps:
- Double check that accuracy of location tracking is sufficient
- Automated task assignment
Week 16
Project Quality Control
This week, we perform extensive testing on the accuracy of location tracking again using the BLE beacons, the temporary map and rooms of UCL. We find that location tracking is sufficiently accurate and that we can proceed to the next stages of the project.
Automated Task Handling
Currently, tasks are assigned manually through the administrator UI. Porters are ranked by their proximity to a task after selecting from a dropdown. However, there is still room for improvement. We could automate this process and automatically message a porter depending on their proximity. If a porter rejects the task, we can then check again and message the next closest porter.
We implement this on the backend of the website.
Additionally in the weekly catchup, we once again chase up on the hospital map.
Next Steps:
- Clarify further requirements that the app needs
- Wait for the hospital map
Week 17
Receiving the Hospital Map
After liasing with our client for several weeks about the matter, our client is able to obtain permission for us to use a floorplan of the hospital. They provide us with a floorplan of each floor of the hospital for our project. This week, having obtained the floorplan, we integrate the floorplan map into our frontend of our webapp. We add buttons to flip between pages of the floorplan.
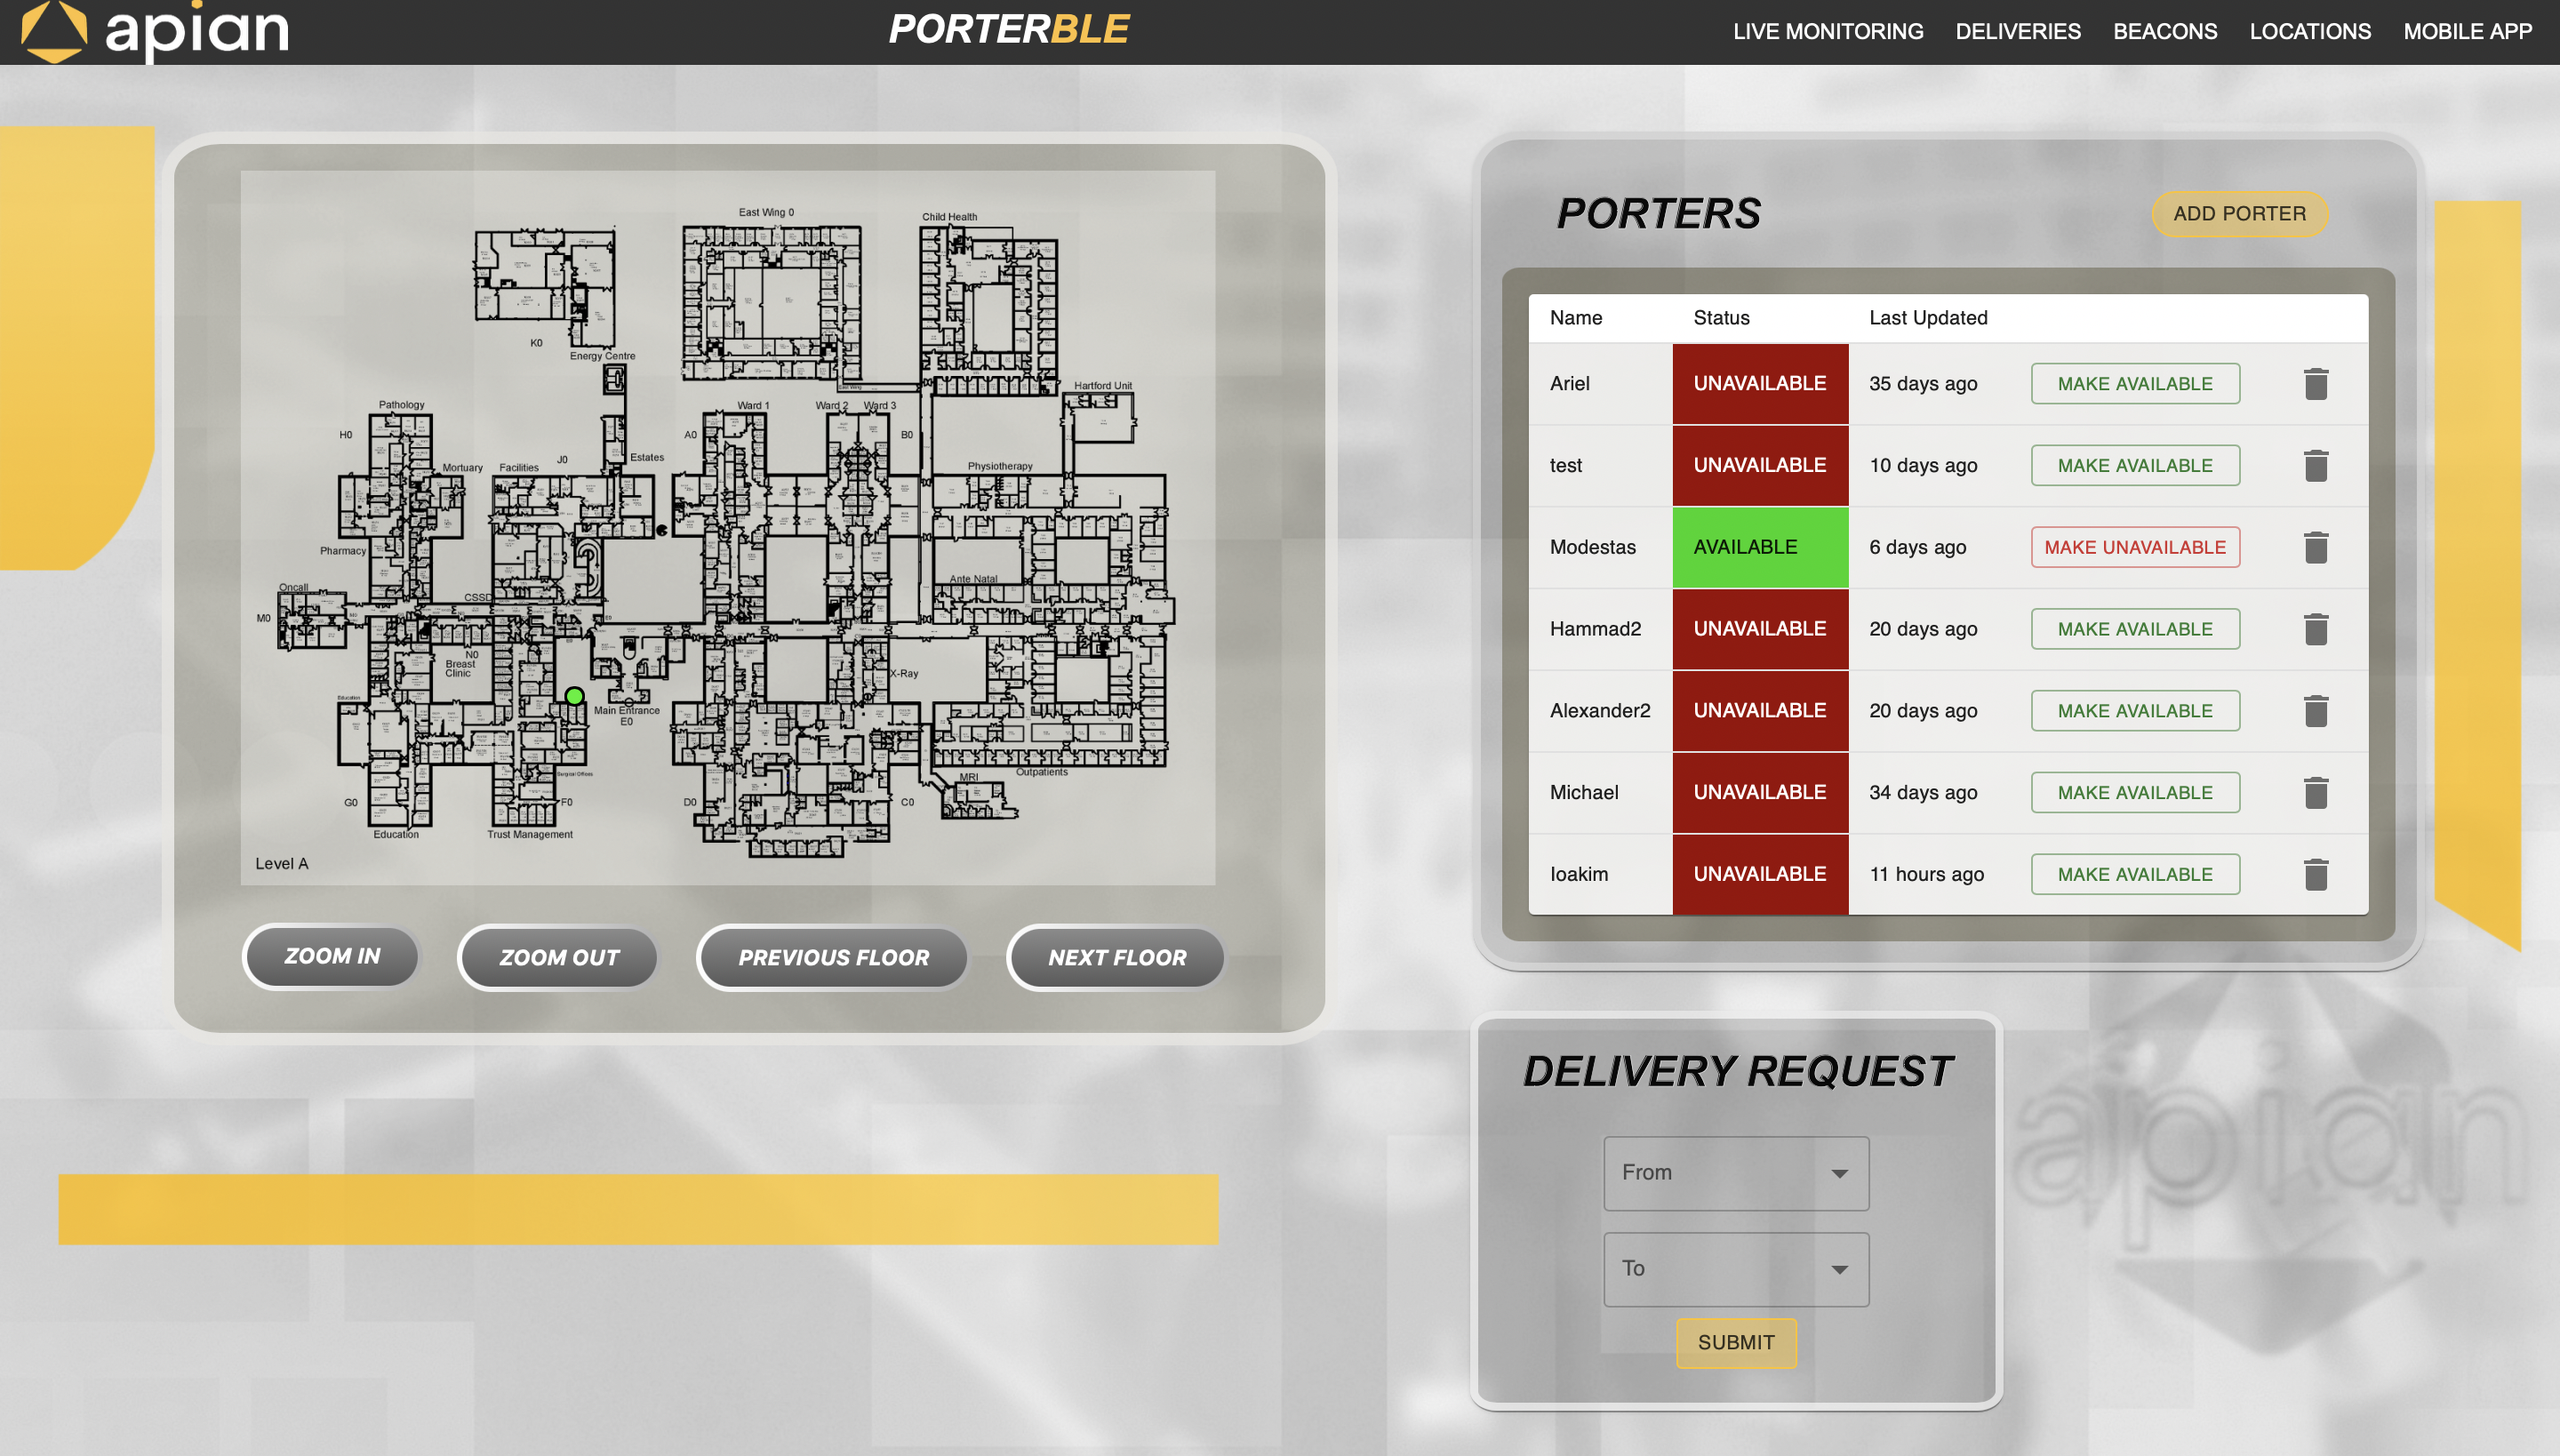
We also conduct extensive UI updates, improving the background, discarding redundant pages that were used for debugging and making the UI more intuitive.
Final Checks with Client
At this stage, having met all the requirements that we set out at the start, we look towards adding additional functionality. This week we also ask our client to run through the app and flag any other features they believe would be beneficial to them for us to implement. They agree that the project seems near completion and say they will get back to us on additional features.
Next Steps:
- Clarify further requirements that the app needs
- Perform Testing
Week 18
Discussion with the Client on Additional Features
At this stage in the project, having already implemented an SMS solution, the client after careful thought decided that it is unlikely that a cross platform solution for other mobile devices will be necessary for our project completion. As such, they agree that a push notification on the android app would be more intuitive to answer and respond to for porters. We both also agree that the SMS solution can be kept for future reference in case it becomes relevant in the future due to privacy concerns, if porters cannot use their personal phones and must use phones with limited features due to budgeting.
Implementing Push Notifications
This week we integrated Firebase Cloud Messaging (FCM) into our application to send push notifications to users' mobile devices. This allows users to receive real-time updates on their deliveries and other relevant information. The integration was seamless as we were already using Firebase for hosting, and it allowed us to add this essential feature to our application easily. FirebaseMessagingConfig.java contains the functionality configuration, and the firebase-service-account.json file defines the Firebase service account.
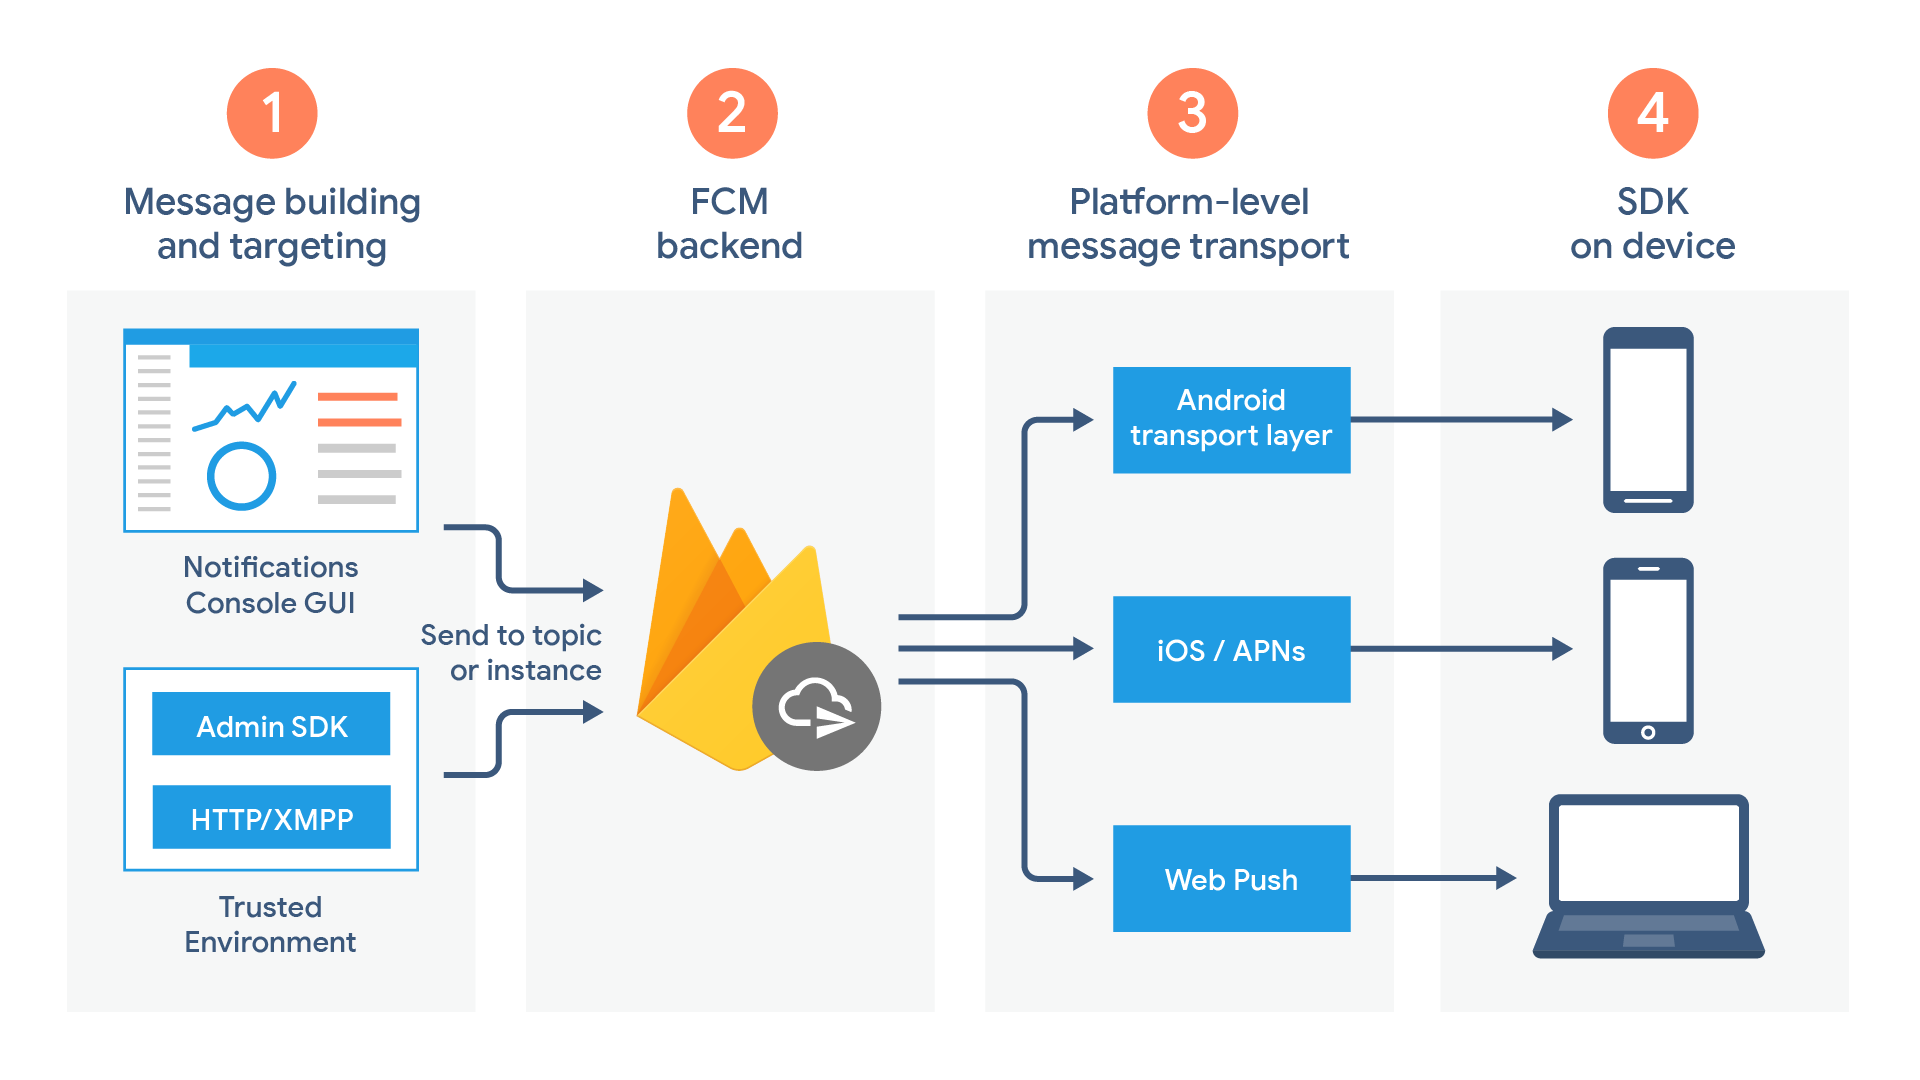
We send push notifications whenever requesting a delivery. To identify a user's mobile phone, we use the FCM token sent to us and associate it with the porter through the POST "/porter/{id}/token/{token}" endpoint when a user logs in.
Having implemented all necessary features, we now need to begin carefully testing the product and making sure that nothing is missing and that behaviour is all intentional. As such, next week we will begin testing.
Next Steps:
- Unit Testing
Monthly Video 3
Week 19
The Importance of Unit Testing
Unit testing is a crucial aspect of our software development process. It allows us to test individual units of our code, such as methods and functions, in isolation to ensure they function as expected and meet the requirements.
Testing the WebApp
For our web application, we utilized JUnit as our primary unit testing tool for backend services, while we used Jest for frontend components. JUnit is a widely used Java testing framework that allowed us to test individual components of our backend service, such as controllers, services, and repositories, while Jest, a popular testing framework for React applications, enabled us to test individual components' functionality in isolation.
Testing the Mobile App
For our Android mobile application, we leveraged the JUnit framework to test the reliability and resilience of our Kotlin methods by executing app functions on the Java Virtual Machine. We followed a test-driven development approach, which allowed us to identify and proactively address potential issues and errors early in the development cycle.
Further Testing Notes
We also implemented unit testing to validate the accuracy and consistency of our beacon detection and formatting functionality, a crucial foundational block of the entire system that enabled our app to accurately identify and track porters within a hospital environment.
Furthermore, we extensively tested the login process for hospital staff using unit tests to ensure quick and secure access to sensitive data. Our unit tests validated key features such as the correct calculation of login action results.
Finally, as part of our unit testing strategy, we focused on identifying and resolving issues with our code logic before they could impact the overall system performance. By leveraging the power of unit testing, we were able to deliver a high-quality product to our clients while demonstrating our commitment to transparency and accountability throughout the development process.
To further ensure our product is usable once the project has finished, we need to conduct compatibility testing of the product and ensure the android app functions on multiple android devices. In particular, we are concerned with how the UI will appear on other devices.
Next Steps:
- Compatibility Testing
Week 20
The Importance of Compatibility for the Mobile App
Mobile app development necessitates the critical aspect of device compatibility testing, which involves evaluating an app's seamless functioning across diverse hardware and software configurations. This was particularly important in our circumstances, given the wide range of Android devices used in different UK hospitals, and the need to ensure that the app operated flawlessly on backup devices during emergency scenarios.
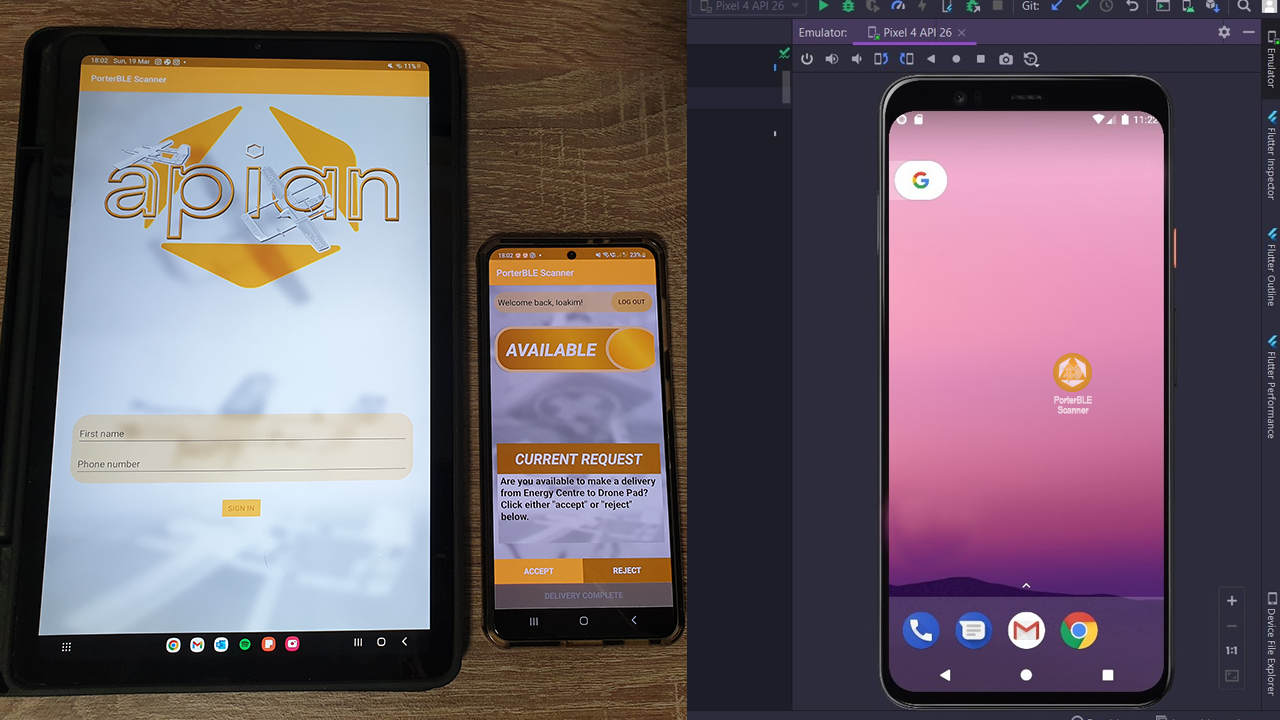
Compatibility Testing
To accomplish comprehensive device compatibility testing, we debugged our application on multiple Android-based platforms, including physical devices from Samsung, Xiaomi, and Google, such as smartphones and tablets. We also used Android Studio's device emulator feature to simulate other devices, which was useful for initial testing but not sufficient for testing hardware-specific features like BLE scanning. Therefore, we prioritized testing on non-emulator devices to ensure accurate testing of our application's functionality. By conducting such testing, we could confidently ensure that our app would deliver optimal user experience on a wide range of devices.
Device compatibility testing was critical in identifying bugs resulting from software variations and diverse hardware specifications. We designed a scalable layout that was optimized for different screen sizes and resolutions to ensure a consistent user experience on all devices. We also addressed compatibility issues resulting from different Android versions or manufacturer-specific software systems, such as Samsung's OneUI.
Documenting Results and Our Solutions
All device compatibility tests were thoroughly documented to serve as a valuable resource for our client in the future. By providing this documentation, our client can refer back to the tests conducted to identify potential causes of any new bugs and troubleshoot any issues. This approach demonstrated our commitment to transparency and accountability throughout the development process.
Now with a product that is clearly compatible with other android devices, we are ready to begin testing the product in an actual hospital: Wansbeck Hospital. This week, we raise this in our weekly meeting.
Next Steps:
- On field testing
Week 21
Testing in Wansbeck Hospital
During the testing phase, we invited hospital porters to use our application and provide us with valuable firsthand feedback. By observing their usage of the application, we were able to note any issues they encountered or features they found confusing, allowing us to make necessary improvements.
Obtaining Feedback
We also conducted feedback sessions with the porters to gather their thoughts on the application's functionality, usability, and overall experience. This feedback was vital in ensuring that the application met the porters' needs and requirements, and allowed us to make necessary changes.
By involving the porters in the testing process, we were able to deliver a high-quality user experience that met their needs. This step was crucial in identifying and addressing any issues before the application was deployed, ensuring that it was fully functional and user-friendly.
In summary, testing is a crucial component of software development that ensures the quality and reliability of an application. We utilized a combination of testing tools and methodologies, including JUnit, MockMVC, Jest, React Testing Library, manual testing, and user testing, to ensure that our application met requirements and delivered a seamless user experience. Our goal was to deliver a bug-free and optimized web and mobile app that could operate flawlessly on a range of devices. By thoroughly testing our applications, we were able to identify and fix issues early in the development process, ensuring that our solution met the highest standards.
Next Steps:
- Finalizing the portfolio
Week 22
Final Thoughts
We have always given high priority to fulfilling the client's project requirements. We have successfully completed and implemented all the "Must Have" features, some of which include:
- Development of an Android app that scans for beacons via Bluetooth and sends the MAC address to our web app when it comes in close proximity to a beacon.
- Real-time monitoring of porters via the Android app and beacons placed throughout the hospital.
- Creation of a functional web app with features such as live monitoring, delivery logs, and the ability to send requests to porters.
Adapting Our Solution During the Project
While attempting to track porters, we encountered issues with the signal strength of the beacons. Achieving 100% accuracy in tracking porters would require multiple beacons to surround the area at all times, so that the app could successfully scan and send the MAC address back to our web app. We proposed an algorithm for triangulating the location of the porter using the distance and signal strength provided by the three closest beacons, but the client cited privacy concerns and rejected the idea. Instead, we suggested a simpler solution, which involved placing more beacons around the pick-up/delivery area, enabling us to keep track of which porters were closest and available for delivery.
Final Functionalities
Our delivery request system is operating flawlessly. Whenever a medical staff dispatcher sends a request to a porter using our web app, the porter receives it immediately and can choose to accept or decline the request. We are pleased to report that our Android app is running smoothly in the background without any issues. The only area where our system may be less efficient is in live monitoring, where we are unable to track the porters' movements with complete accuracy. However, we proposed a solution that our client found acceptable and would function effectively.
Compatibility
Our Android app can be downloaded as an APK from our public website: https://porterble-ui-c29ff.web.app/appInstructions. Additionally, our web app is publicly hosted and accessible through the same link.
Maintainability
Through careful design and planning before coding, we were able to avoid issues such as "dead code," bugs, and vulnerabilities. Our code is thoroughly documented, and we conduct regular code reviews with the team to ensure everyone is aware of what's happening. Our project is easily scalable, and implementing new features does not require extensive changes to existing code. For instance, we initially created a floor plan with markers and beacons before receiving the final hospital floor plan. However, once we received the updated plan from the client, we were able to make the necessary changes with all functionalities still working perfectly.